大型语言模型的低秩适应 (LoRA)
译者:片刻小哥哥
项目地址:https://huggingface.apachecn.org/docs/diffusers/training/lora
这是一个实验性功能。其 API 将来可能会发生变化。
大型语言模型的低秩适应(LoRA) 是一种加速大型模型训练同时消耗更少内存的训练方法。它添加了成对的排序分解权重矩阵(称为 更新矩阵 )到现有权重,以及 仅有的 训练那些新增加的重量。这有几个优点:
- 之前的预训练权重保持冻结,因此模型不易出现 灾难性遗忘 。
- 等级分解矩阵的参数比原始模型少得多,这意味着训练后的 LoRA 权重很容易移植。
- LoRA矩阵一般会添加到原始模型的注意力层中。 🧨 扩散器提供
load_attn_procs()
将 LoRA 权重加载到模型注意力层的方法。您可以通过以下方式控制模型适应新训练图像的程度:
规模范围。 - 更高的内存效率使您可以在 Tesla T4、RTX 3080 甚至 RTX 2080 Ti 等消费类 GPU 上运行微调!像 T4 这样的 GPU 是免费的,并且可以在 Kaggle 或 Google Colab 笔记本中轻松访问。
💡 LoRA 不仅仅局限于注意力层。作者发现修改 语言模型的注意力层足以高效地获得良好的下游性能。这就是为什么通常只将 LoRA 权重添加到模型的注意力层中的原因。查看 使用LoRA进行高效的稳定扩散微调 博客以获取有关 LoRA 如何工作的更多信息!
cloneofsimo 是第一个在流行的领域尝试 LoRA 稳定扩散训练的人 洛拉 GitHub 存储库。 🧨 Diffusers 现在支持使用 LoRA 进行微调 文本到图像生成 和 DreamBooth 。本指南将向您展示如何做到这两点。
如果您想存储或与社区分享您的模型,请登录您的 Hugging Face 帐户(创建 一 如果您还没有):
huggingface-cli login
文本转图像
对像稳定扩散这样具有数十亿个参数的模型进行微调可能既缓慢又困难。借助 LoRA,可以更轻松、更快速地微调扩散模型。它可以在具有低至 11GB GPU RAM 的硬件上运行,而无需借助 8 位优化器等技巧。
训练
让我们微调一下
stable-diffusion-v1-5
于
神奇宝贝 BLIP 字幕
数据集来生成您自己的神奇宝贝。
指定
型号_名称
环境变量(集线器模型存储库 ID 或包含模型权重的目录的路径)并将其传递给
pretrained_model_name_or_path
争论。您还需要设置
数据集名称
环境变量为您要训练的数据集的名称。要使用您自己的数据集,请查看
创建训练数据集
指导。
这
输出目录
和
HUB_MODEL_ID
变量是可选的,指定模型在 Hub 上的保存位置:
export MODEL_NAME="runwayml/stable-diffusion-v1-5"
export OUTPUT_DIR="/sddata/finetune/lora/pokemon"
export HUB_MODEL_ID="pokemon-lora"
export DATASET_NAME="lambdalabs/pokemon-blip-captions"
在开始训练之前,需要注意一些标志:
--push_to_hub将经过训练的 LoRA 嵌入存储在 Hub 上。--report_to=wandb将训练结果报告并记录到您的权重和偏差仪表板(例如,看看这个 报告 )。--learning_rate=1e-04,您可以使用比 LoRA 通常更高的学习率。
现在您已准备好启动培训(您可以找到完整的培训脚本
此处
)。在具有 11GB RAM 的 2080 Ti GPU 上进行训练大约需要 5 个小时,它将创建并保存模型检查点和
pytorch_lora_weights
在你的存储库中。
accelerate launch --mixed_precision="fp16" train_text_to_image_lora.py --pretrained_model_name_or_path=$MODEL\_NAME --dataset_name=$DATASET\_NAME --dataloader_num_workers=8 --resolution=512 --center_crop --random_flip --train_batch_size=1 --gradient_accumulation_steps=4 --max_train_steps=15000 --learning_rate=1e-04 --max_grad_norm=1 --lr_scheduler="cosine" --lr_warmup_steps=0 --output_dir=${OUTPUT\_DIR} --push_to_hub --hub_model_id=${HUB\_MODEL\_ID} --report_to=wandb --checkpointing_steps=500 --validation_prompt="A pokemon with blue eyes." --seed=1337
推理
现在您可以通过在中加载基础模型来使用模型进行推理 StableDiffusionPipeline 然后是 DPMSolverMultistepScheduler :
>>> import torch
>>> from diffusers import StableDiffusionPipeline, DPMSolverMultistepScheduler

>>> model_base = "runwayml/stable-diffusion-v1-5"

>>> pipe = StableDiffusionPipeline.from_pretrained(model_base, torch_dtype=torch.float16, use_safetensors=True)
>>> pipe.scheduler = DPMSolverMultistepScheduler.from_config(pipe.scheduler.config)
从微调模型加载 LoRA 权重
在基本模型权重之上
,然后将管道移至 GPU 以加快推理速度。当您将 LoRA 权重与冻结的预训练模型权重合并时,您可以选择调整与 LoRA 权重合并的权重数量。
规模
范围:
💡A
规模
的价值
0
与不使用 LoRA 权重相同,您仅使用基本模型权重,并且
规模
的价值
1
意味着您仅使用完全微调的 LoRA 权重。值介于
0
和
1
在两个权重之间进行插值。
>>> pipe.unet.load_attn_procs(lora_model_path)
>>> pipe.to("cuda")
# use half the weights from the LoRA finetuned model and half the weights from the base model

>>> image = pipe(
...     "A pokemon with blue eyes.", num_inference_steps=25, guidance_scale=7.5, cross_attention_kwargs={"scale": 0.5}
... ).images[0]
# use the weights from the fully finetuned LoRA model

>>> image = pipe("A pokemon with blue eyes.", num_inference_steps=25, guidance_scale=7.5).images[0]
>>> image.save("blue\_pokemon.png")
如果您要从 Hub 加载 LoRA 参数,并且 Hub 存储库有
A
基础模型
标签(例如
这个
), 然后
你可以做:
from huggingface_hub.repocard import RepoCard

lora_model_id = "sayakpaul/sd-model-finetuned-lora-t4"
card = RepoCard.load(lora_model_id)
base_model_id = card.data.to_dict()["base\_model"]

pipe = StableDiffusionPipeline.from_pretrained(base_model_id, torch_dtype=torch.float16, use_safetensors=True)
...
梦想展位
DreamBooth 是一种微调技术,用于个性化文本到图像模型(例如稳定扩散),以在给定主题的一些图像的情况下生成不同上下文中主题的照片级真实感图像。然而DreamBooth对超参数非常敏感,很容易过拟合。需要考虑的一些重要超参数包括影响训练时间(学习率、训练步骤数)和推理时间(步骤数、调度程序类型)的参数。
💡 看看 使用 🧨 扩散器通过 DreamBooth 训练稳定扩散 博客深入分析 DreamBooth 实验和推荐设置。
训练
让我们微调一下
stable-diffusion-v1-5
与 DreamBooth 和 LoRA 以及一些 🐶
狗图片
。下载这些图像并将其保存到目录中。要使用您自己的数据集,请查看
创建训练数据集
指导。
首先,指定
型号_名称
环境变量(集线器模型存储库 ID 或包含模型权重的目录的路径)并将其传递给
pretrained_model_name_or_path
争论。您还需要设置
INSTANCE_DIR
到包含图像的目录的路径。
这
输出目录
变量是可选的,指定在 Hub 上保存模型的位置:
export MODEL_NAME="runwayml/stable-diffusion-v1-5"
export INSTANCE_DIR="path-to-instance-images"
export OUTPUT_DIR="path-to-save-model"
在开始训练之前,需要注意一些标志:
--push_to_hub将经过训练的 LoRA 嵌入存储在 Hub 上。--report_to=wandb将训练结果报告并记录到您的权重和偏差仪表板(例如,看看这个 报告 )。--learning_rate=1e-04,您可以使用比 LoRA 通常更高的学习率。
现在您已准备好启动培训(您可以找到完整的培训脚本
此处
)。该脚本创建并保存模型检查点和
pytorch_lora_weights.bin
文件在您的存储库中。
还可以使用 LoRA 对文本编码器进行额外微调。在大多数情况下,这会导致
通过稍微增加计算量来获得更好的结果。为了允许使用 LoRA 微调文本编码器,
指定
--train_text_encoder
同时启动
train_dreambooth_lora.py
脚本。
accelerate launch train_dreambooth_lora.py --pretrained_model_name_or_path=$MODEL\_NAME --instance_data_dir=$INSTANCE\_DIR --output_dir=$OUTPUT\_DIR --instance_prompt="a photo of sks dog" --resolution=512 --train_batch_size=1 --gradient_accumulation_steps=1 --checkpointing_steps=100 --learning_rate=1e-4 --report_to="wandb" --lr_scheduler="constant" --lr_warmup_steps=0 --max_train_steps=500 --validation_prompt="A photo of sks dog in a bucket" --validation_epochs=50 --seed="0" --push_to_hub
推理
现在您可以通过在中加载基础模型来使用模型进行推理 StableDiffusionPipeline :
>>> import torch
>>> from diffusers import StableDiffusionPipeline

>>> model_base = "runwayml/stable-diffusion-v1-5"

>>> pipe = StableDiffusionPipeline.from_pretrained(model_base, torch_dtype=torch.float16, use_safetensors=True)
从微调的 DreamBooth 模型加载 LoRA 权重
在基本模型权重之上
,然后将管道移至 GPU 以加快推理速度。当您将 LoRA 权重与冻结的预训练模型权重合并时,您可以选择调整与 LoRA 权重合并的权重数量。
规模
范围:
💡A
规模
的价值
0
与不使用 LoRA 权重相同,您仅使用基本模型权重,并且
规模
的价值
1
意味着您仅使用完全微调的 LoRA 权重。值介于
0
和
1
在两个权重之间进行插值。
>>> pipe.unet.load_attn_procs(lora_model_path)
>>> pipe.to("cuda")
# use half the weights from the LoRA finetuned model and half the weights from the base model

>>> image = pipe(
...     "A picture of a sks dog in a bucket.",
...     num_inference_steps=25,
...     guidance_scale=7.5,
...     cross_attention_kwargs={"scale": 0.5},
... ).images[0]
# use the weights from the fully finetuned LoRA model

>>> image = pipe("A picture of a sks dog in a bucket.", num_inference_steps=25, guidance_scale=7.5).images[0]
>>> image.save("bucket-dog.png")
如果你用过
--train_text_encoder
在训练期间,然后使用
pipe.load_lora_weights()
加载 LoRA
重量。例如:
from huggingface_hub.repocard import RepoCard
from diffusers import StableDiffusionPipeline
import torch

lora_model_id = "sayakpaul/dreambooth-text-encoder-test"
card = RepoCard.load(lora_model_id)
base_model_id = card.data.to_dict()["base\_model"]

pipe = StableDiffusionPipeline.from_pretrained(base_model_id, torch_dtype=torch.float16, use_safetensors=True)
pipe = pipe.to("cuda")
pipe.load_lora_weights(lora_model_id)
image = pipe("A picture of a sks dog in a bucket", num_inference_steps=25).images[0]
如果您的 LoRA 参数涉及 UNet 以及文本编码器,则传递
cross_attention_kwargs={"scale": 0.5}
将应用
规模
对 UNet 的价值
和文本编码器。
请注意,使用 load_lora_weights() 优先于 load_attn_procs() 用于加载 LoRA 参数。这是因为 load_lora_weights() 可以处理以下情况:
- LoRA 参数没有单独的 UNet 和文本编码器标识符(例如
"patrickvonplaten/lora_dreambooth_dog_example")。所以,你可以这样做:
pipe.load_lora_weights(lora_model_path)
- LoRA parameters that have separate identifiers for the UNet and the text encoder such as:
"sayakpaul/dreambooth".
您还可以提供本地目录路径 load_lora_weights() 也 load_attn_procs() 。
稳定扩散XL
我们支持微调 稳定扩散XL 。请参考以下文档:
卸载LoRA参数
您可以致电 卸载_lora_weights() 在管道上卸载 LoRA 参数。
融合LoRA参数
您可以致电 fuse_lora() 在管道上将 LoRA 参数与底层模型的原始参数合并。这可能会导致推理延迟的潜在加速。
解除 LoRA 参数融合
撤销
保险丝劳拉
, 称呼
unfuse_lora()
在管道上。
使用 LoRA 融合时使用不同的 LoRA 规模
如果您需要使用
规模
当与
fuse_lora()
要控制 LoRA 参数对输出的影响,您应该指定
lora_scale
之内
fuse_lora()
。通过
规模
参数为
cross_attention_kwargs
当你调用管道时将无法工作。
要使用不同的
lora_scale
和
fuse_lora()
,你应该先打电话
unfuse_lora()
在相应的管道上并调用
fuse_lora()
再次与预期
lora_scale
。
from diffusers import DiffusionPipeline
import torch

pipe = DiffusionPipeline.from_pretrained("stabilityai/stable-diffusion-xl-base-1.0", torch_dtype=torch.float16).to("cuda")
lora_model_id = "hf-internal-testing/sdxl-1.0-lora"
lora_filename = "sd\_xl\_offset\_example-lora\_1.0.safetensors"
pipe.load_lora_weights(lora_model_id, weight_name=lora_filename)

# This uses a default `lora\_scale` of 1.0.
pipe.fuse_lora()

generator = torch.manual_seed(0)
images_fusion = pipe(
    "masterpiece, best quality, mountain", generator=generator, num_inference_steps=2
).images

# To work with a different `lora\_scale`, first reverse the effects of `fuse\_lora()`.
pipe.unfuse_lora()

# Then proceed as follows.
pipe.load_lora_weights(lora_model_id, weight_name=lora_filename)
pipe.fuse_lora(lora_scale=0.5)

generator = torch.manual_seed(0)
images_fusion = pipe(
    "masterpiece, best quality, mountain", generator=generator, num_inference_steps=2
).images
使用融合 LoRA 参数序列化管道
假设您想要加载上面的管道,其 UNet 与 LoRA 参数融合。您只需调用
save_pretrained()
方法上
管道
。
将 LoRA 参数加载到管道后,如果您想要序列化管道以使受影响的模型组件已经与 LoRA 参数融合,您应该:
- 称呼
fuse_lora()在管道上与所需的lora_scale,前提是您已经将 LoRA 参数加载到其中。 - 称呼
save_pretrained()在管道上。
这是一个完整的例子:
from diffusers import DiffusionPipeline
import torch

pipe = DiffusionPipeline.from_pretrained("stabilityai/stable-diffusion-xl-base-1.0", torch_dtype=torch.float16).to("cuda")
lora_model_id = "hf-internal-testing/sdxl-1.0-lora"
lora_filename = "sd\_xl\_offset\_example-lora\_1.0.safetensors"
pipe.load_lora_weights(lora_model_id, weight_name=lora_filename)

# First, fuse the LoRA parameters.
pipe.fuse_lora()

# Then save.
pipe.save_pretrained("my-pipeline-with-fused-lora")
现在,您可以加载管道并直接执行推理,而无需再次加载LoRA参数:
from diffusers import DiffusionPipeline
import torch

pipe = DiffusionPipeline.from_pretrained("my-pipeline-with-fused-lora", torch_dtype=torch.float16).to("cuda")

generator = torch.manual_seed(0)
images_fusion = pipe(
    "masterpiece, best quality, mountain", generator=generator, num_inference_steps=2
).images
使用多个 LoRA 检查点
随着
fuse_lora()
如上所述的方法,可以加载多个LoRA检查点。让我们看一个完整的例子。首先我们加载基础管道:
from diffusers import StableDiffusionXLPipeline, AutoencoderKL
import torch

vae = AutoencoderKL.from_pretrained("madebyollin/sdxl-vae-fp16-fix", torch_dtype=torch.float16)
pipe = StableDiffusionXLPipeline.from_pretrained(
    "stabilityai/stable-diffusion-xl-base-1.0",
    vae=vae,
    torch_dtype=torch.float16,
)
pipe.to("cuda")
然后让我们两个 LoRA 检查点并将它们与特定的融合
lora_scale
价值观:
# LoRA one.
pipe.load_lora_weights("goofyai/cyborg\_style\_xl")
pipe.fuse_lora(lora_scale=0.7)

# LoRA two.
pipe.load_lora_weights("TheLastBen/Pikachu\_SDXL")
pipe.fuse_lora(lora_scale=0.7)
玩
lora_scale
与多个 LoRA 一起使用时的参数,以控制它们对最终输出的影响程度。
让我们看看他们的实际行动:
prompt = "cyborg style pikachu"
image = pipe(prompt, num_inference_steps=30, guidance_scale=7.5).images[0]

目前,取消多个 LoRA 检查点的融合是不可能的。
支持 Diffusers 的不同 LoRA 检查点
🤗 Diffusers 支持从流行的 LoRA 训练器加载检查点,例如 Kohya 和 TheLastBen 。在本节中,我们概述了当前 API 的详细信息和限制。
科亚
这种支持之所以成为可能,是因为有出色的贡献者: @takuma104 和 @isidentical 。
我们支持使用以下方式加载 Kohya LoRA 检查点 load_lora_weights() 。在本节中,我们将解释如何从加载这样的检查点 CivitAI 在 Diffusers 中并用它进行推理。
首先,下载检查点。我们将使用 这个 出于演示目的。
wget https://civitai.com/api/download/models/15603 -O light_and_shadow.safetensors
接下来我们初始化一个 ~DiffusionPipeline :
import torch

from diffusers import StableDiffusionPipeline, DPMSolverMultistepScheduler

pipeline = StableDiffusionPipeline.from_pretrained(
    "gsdf/Counterfeit-V2.5", torch_dtype=torch.float16, safety_checker=None, use_safetensors=True
).to("cuda")
pipeline.scheduler = DPMSolverMultistepScheduler.from_config(
    pipeline.scheduler.config, use_karras_sigmas=True
)
然后我们加载从 CivitAI 下载的检查点:
pipeline.load_lora_weights(".", weight_name="light\_and\_shadow.safetensors")
如果您正在加载检查点
安全张量
格式,请确保您有
安全张量
安装。
然后是运行推理的时候了:
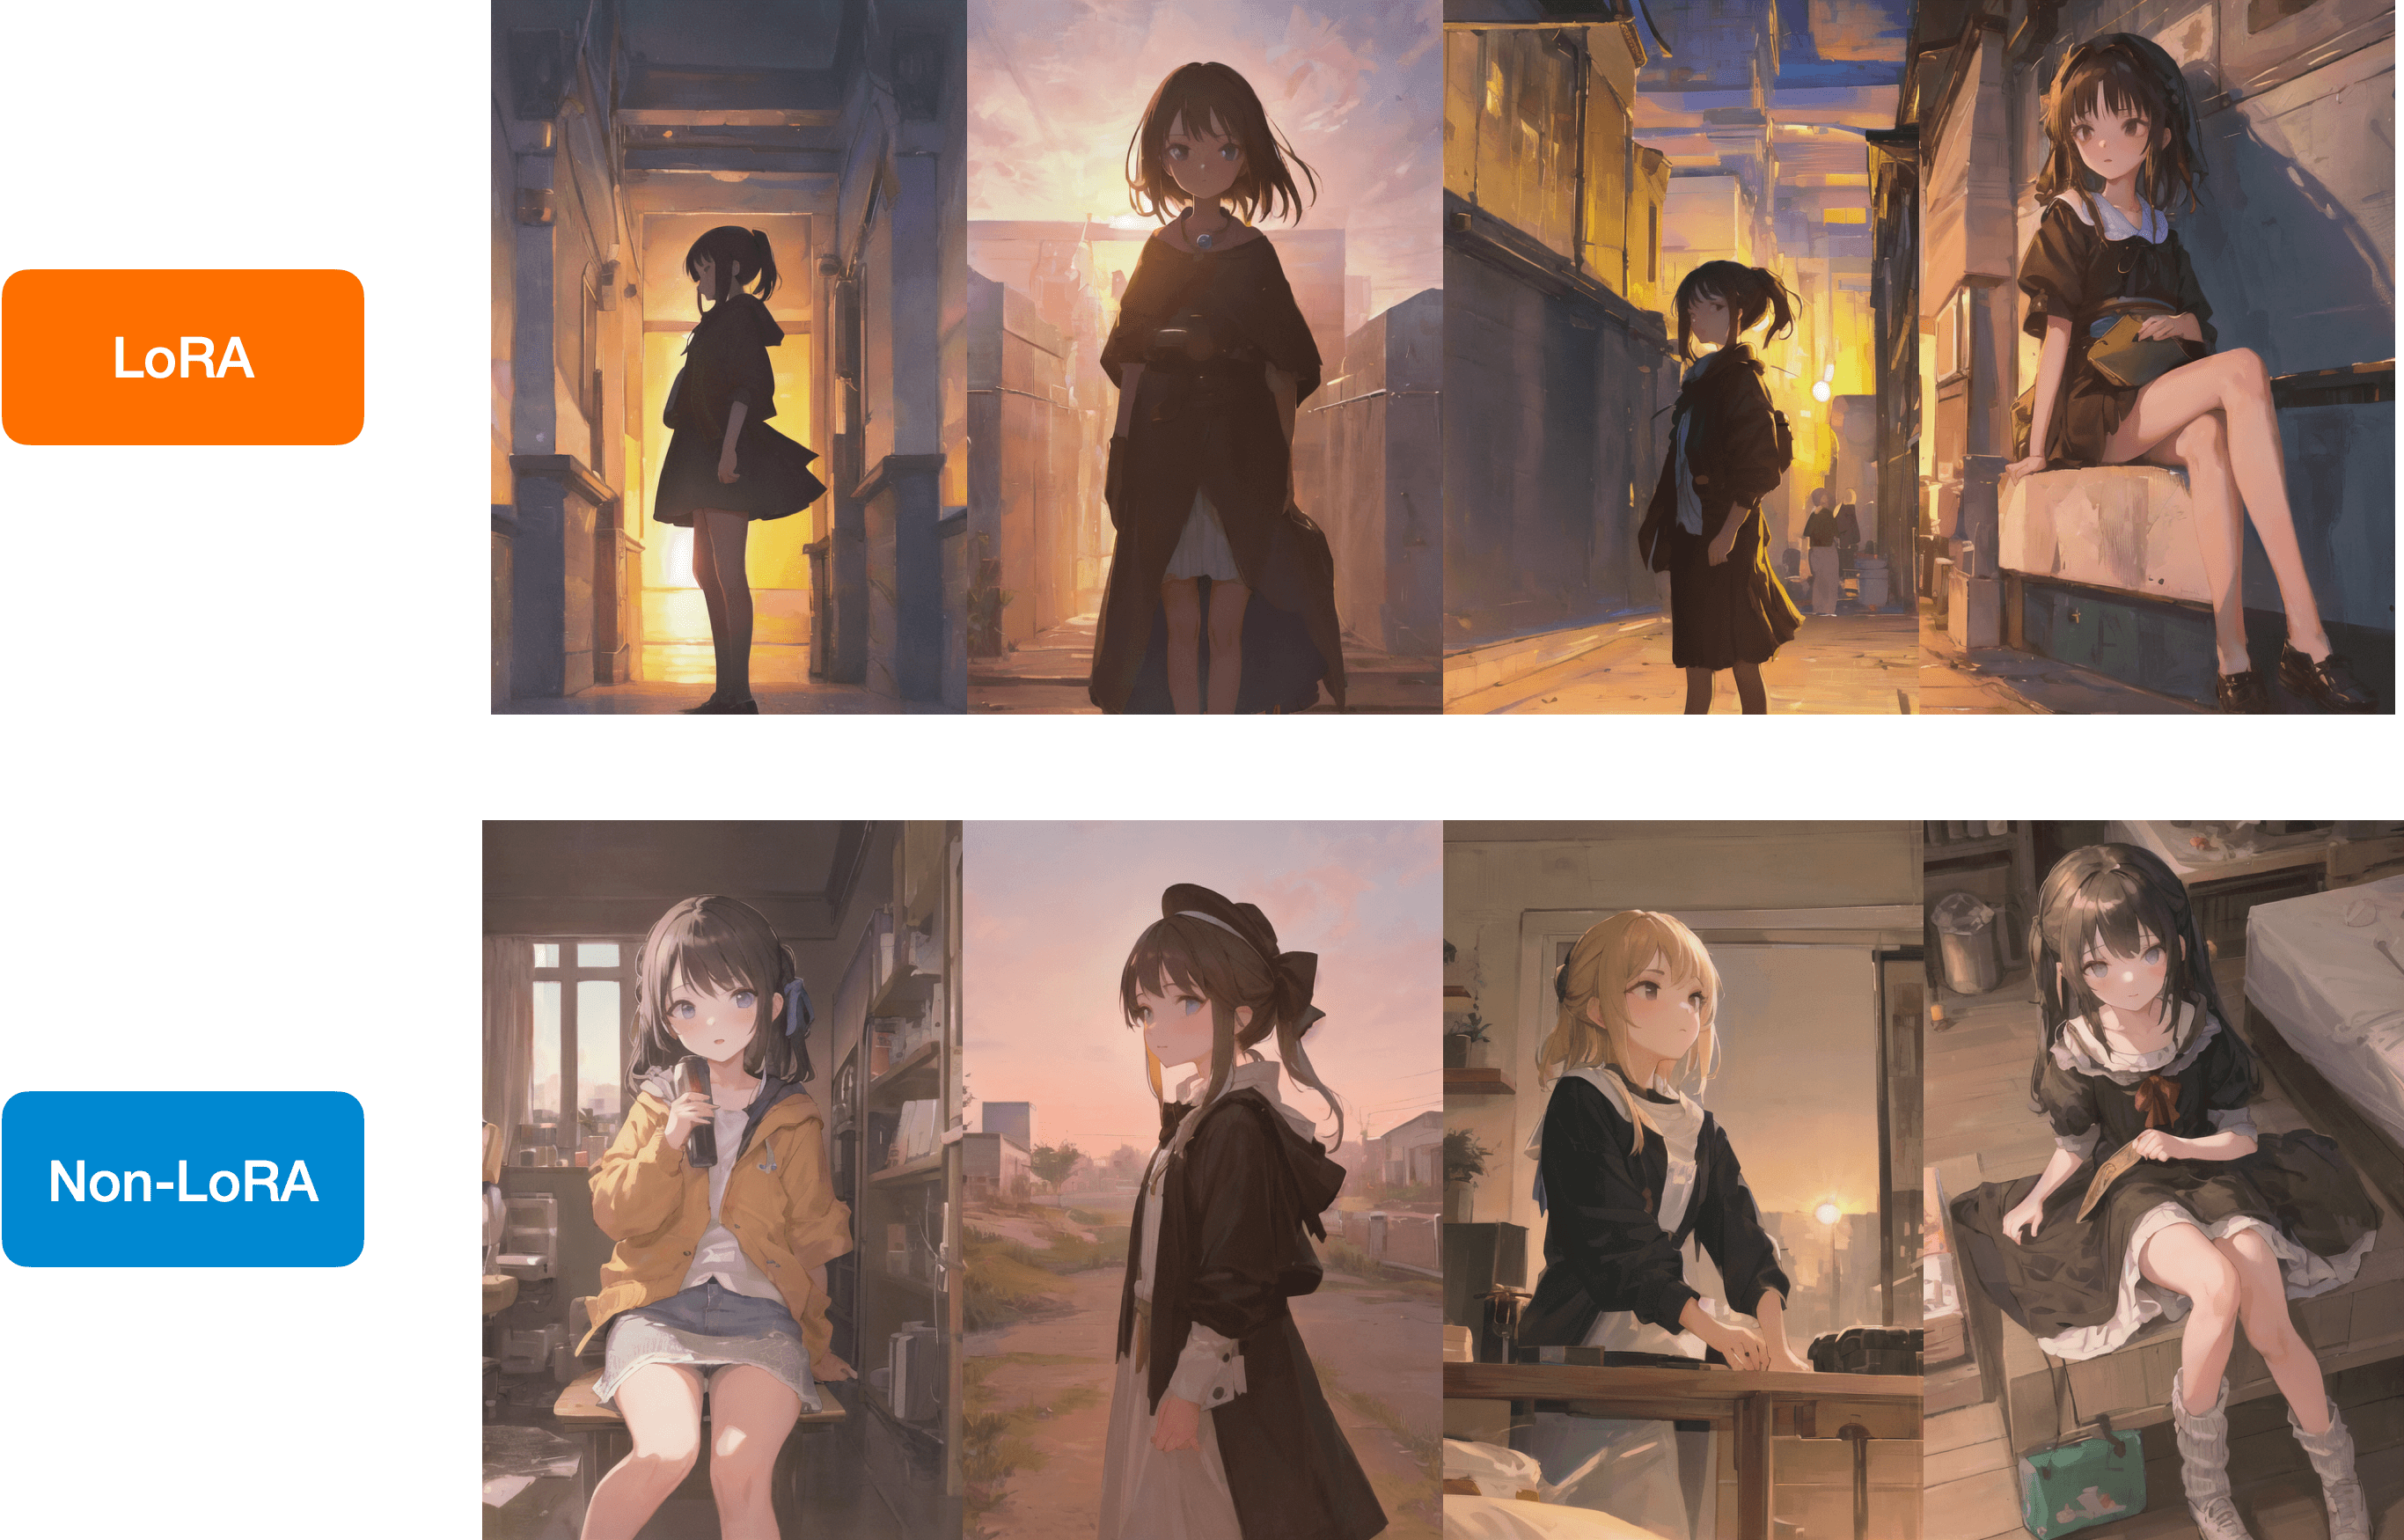
prompt = "masterpiece, best quality, 1girl, at dusk"
negative_prompt = ("(low quality, worst quality:1.4), (bad anatomy), (inaccurate limb:1.2), "
                   "bad composition, inaccurate eyes, extra digit, fewer digits, (extra arms:1.2), large breasts")

images = pipeline(prompt=prompt,
    negative_prompt=negative_prompt,
    width=512,
    height=768,
    num_inference_steps=15,
    num_images_per_prompt=4,
    generator=torch.manual_seed(0)
).images
下面是 LoRA 和非 LoRA 结果之间的比较:
您在 Hugging Face Hub 上存储了一个类似的检查点,您可以加载它 直接与 load_lora_weights() 像这样:
lora_model_id = "sayakpaul/civitai-light-shadow-lora"
lora_filename = "light\_and\_shadow.safetensors"
pipeline.load_lora_weights(lora_model_id, weight_name=lora_filename)
Kohya + 稳定扩散 XL
发布后 稳定扩散XL ,社区贡献了一些令人惊叹的 LoRA 检查点,并在 Kohya 训练器的基础上进行了训练。
以下是我们尝试过的一些检查点示例:
- SDXL 0.9:
- https://civitai.com/models/22279?modelVersionId=118556
- https://civitai.com/models/104515/sdxlor30costumesrevue-starlight-saijoclaudine-lora
- https://civitai.com/models/108448/daiton-sdxl-test
- https://filebin.net/2ntfqqnapiu9q3zx/pixelbuildings128-v1.safetensors
- SDXL 1.0:
- https://huggingface.co/stabilityai/stable-diffusion-xl-base-1.0/blob/main/sd_xl_offset_example-lora_1.0.safetensors
以下是如何使用这些检查点进行推理的示例
扩散器
:
from diffusers import DiffusionPipeline
import torch

base_model_id = "stabilityai/stable-diffusion-xl-base-0.9"
pipeline = DiffusionPipeline.from_pretrained(base_model_id, torch_dtype=torch.float16).to("cuda")
pipeline.load_lora_weights(".", weight_name="Kamepan.safetensors")

prompt = "anime screencap, glint, drawing, best quality, light smile, shy, a full body of a girl wearing wedding dress in the middle of the forest beneath the trees, fireflies, big eyes, 2d, cute, anime girl, waifu, cel shading, magical girl, vivid colors, (outline:1.1), manga anime artstyle, masterpiece, official wallpaper, glint <lora:kame\_sdxl\_v2:1>"
negative_prompt = "(deformed, bad quality, sketch, depth of field, blurry:1.1), grainy, bad anatomy, bad perspective, old, ugly, realistic, cartoon, disney, bad proportions"
generator = torch.manual_seed(2947883060)
num_inference_steps = 30
guidance_scale = 7

image = pipeline(
    prompt=prompt, negative_prompt=negative_prompt, num_inference_steps=num_inference_steps,
    generator=generator, guidance_scale=guidance_scale
).images[0]
image.save("Kamepan.png")
Kamepan.safetensors
来自
https://civitai.com/models/22279?modelVersionId=118556
。
如果您仔细观察,推理用户体验与我们在上面部分中介绍的完全相同。
谢谢 @isidentical 帮助我们集成此功能。
特定于 Kohya LoRA 的已知限制 :
- 当图像看起来与其他 UI(例如 ComfyUI)不相似时,可能是由于多种原因造成的,如所解释的 此处 。
- 我们不完全支持
LyCORIS 检查点
。据我们所知,我们目前
load_lora_weights()应支持具有 LoRA 和 LoCon 模块的 LyCORIS 检查点,但不支持其他模块,例如 Hada、LoKR 等。
最后的本
这是一个例子:
from diffusers import DiffusionPipeline
import torch

pipeline_id = "Lykon/dreamshaper-xl-1-0"

pipe = DiffusionPipeline.from_pretrained(pipeline_id, torch_dtype=torch.float16)
pipe.enable_model_cpu_offload()

lora_model_id = "TheLastBen/Papercut\_SDXL"
lora_filename = "papercut.safetensors"
pipe.load_lora_weights(lora_model_id, weight_name=lora_filename)

prompt = "papercut sonic"
image = pipe(prompt=prompt, num_inference_steps=20, generator=torch.manual_seed(0)).images[0]
image
