JAX/亚麻
译者:片刻小哥哥
项目地址:https://huggingface.apachecn.org/docs/diffusers/using-diffusers/stable_diffusion_jax_how_to
原始地址:https://huggingface.co/docs/diffusers/using-diffusers/stable_diffusion_jax_how_to
![]()

🤗 Diffusers 支持 Flax 在 Google TPU 上进行超快速推理,例如 Colab、Kaggle 或 Google Cloud Platform 中提供的 TPU。本指南向您展示如何使用 JAX/Flax 通过稳定扩散运行推理。
在开始之前,请确保已安装必要的库:
# uncomment to install the necessary libraries in Colab
#!pip install -q jax==0.3.25 jaxlib==0.3.25 flax transformers ftfy
#!pip install -q diffusers
您还应该确保您使用的是 TPU 后端。虽然 JAX 并不专门在 TPU 上运行,但您将在 TPU 上获得最佳性能,因为每台服务器都有 8 个并行工作的 TPU 加速器。
如果您在 Colab 中运行本指南,请选择 运行 在上面的菜单中,选择选项 更改运行时类型 ,然后选择 热塑性聚氨酯 在下面 硬件加速器 环境。导入 JAX 并快速检查您是否正在使用 TPU:
import jax
import jax.tools.colab_tpu
jax.tools.colab_tpu.setup_tpu()

num_devices = jax.device_count()
device_type = jax.devices()[0].device_kind

print(f"Found {num\_devices} JAX devices of type {device\_type}.")
assert (
    "TPU" in device_type,
    "Available device is not a TPU, please select TPU from Edit > Notebook settings > Hardware accelerator"
)
"Found 8 JAX devices of type Cloud TPU."
太好了,现在您可以导入所需的其余依赖项:
import numpy as np
import jax.numpy as jnp

from pathlib import Path
from jax import pmap
from flax.jax_utils import replicate
from flax.training.common_utils import shard
from PIL import Image

from huggingface_hub import notebook_login
from diffusers import FlaxStableDiffusionPipeline
加载模型
Flax 是一个函数式框架,因此模型是无状态的,参数存储在模型外部。加载预训练的 Flax 管道返回
两个都
管道和模型权重(或参数)。在本指南中,您将使用
bfloat16
,TPU 支持的更高效的半浮点类型(您也可以使用
float32
如果需要的话,可以达到完全精度)。
dtype = jnp.bfloat16
pipeline, params = FlaxStableDiffusionPipeline.from_pretrained(
    "CompVis/stable-diffusion-v1-4",
    revision="bf16",
    dtype=dtype,
)
推理
TPU 通常有 8 个设备并行工作,因此让我们对每个设备使用相同的提示。这意味着您可以同时在 8 个设备上执行推理,每个设备生成一张图像。因此,您将获得 8 张图像,所用时间与一个芯片生成一张图像所需的时间相同!
了解更多详细信息,请参阅 并行化如何工作? 部分。
复制提示后,通过调用获取标记化文本 ID
准备输入
管道上的功能。根据底层 CLIP 文本模型配置的要求,标记化文本的长度设置为 77 个标记。
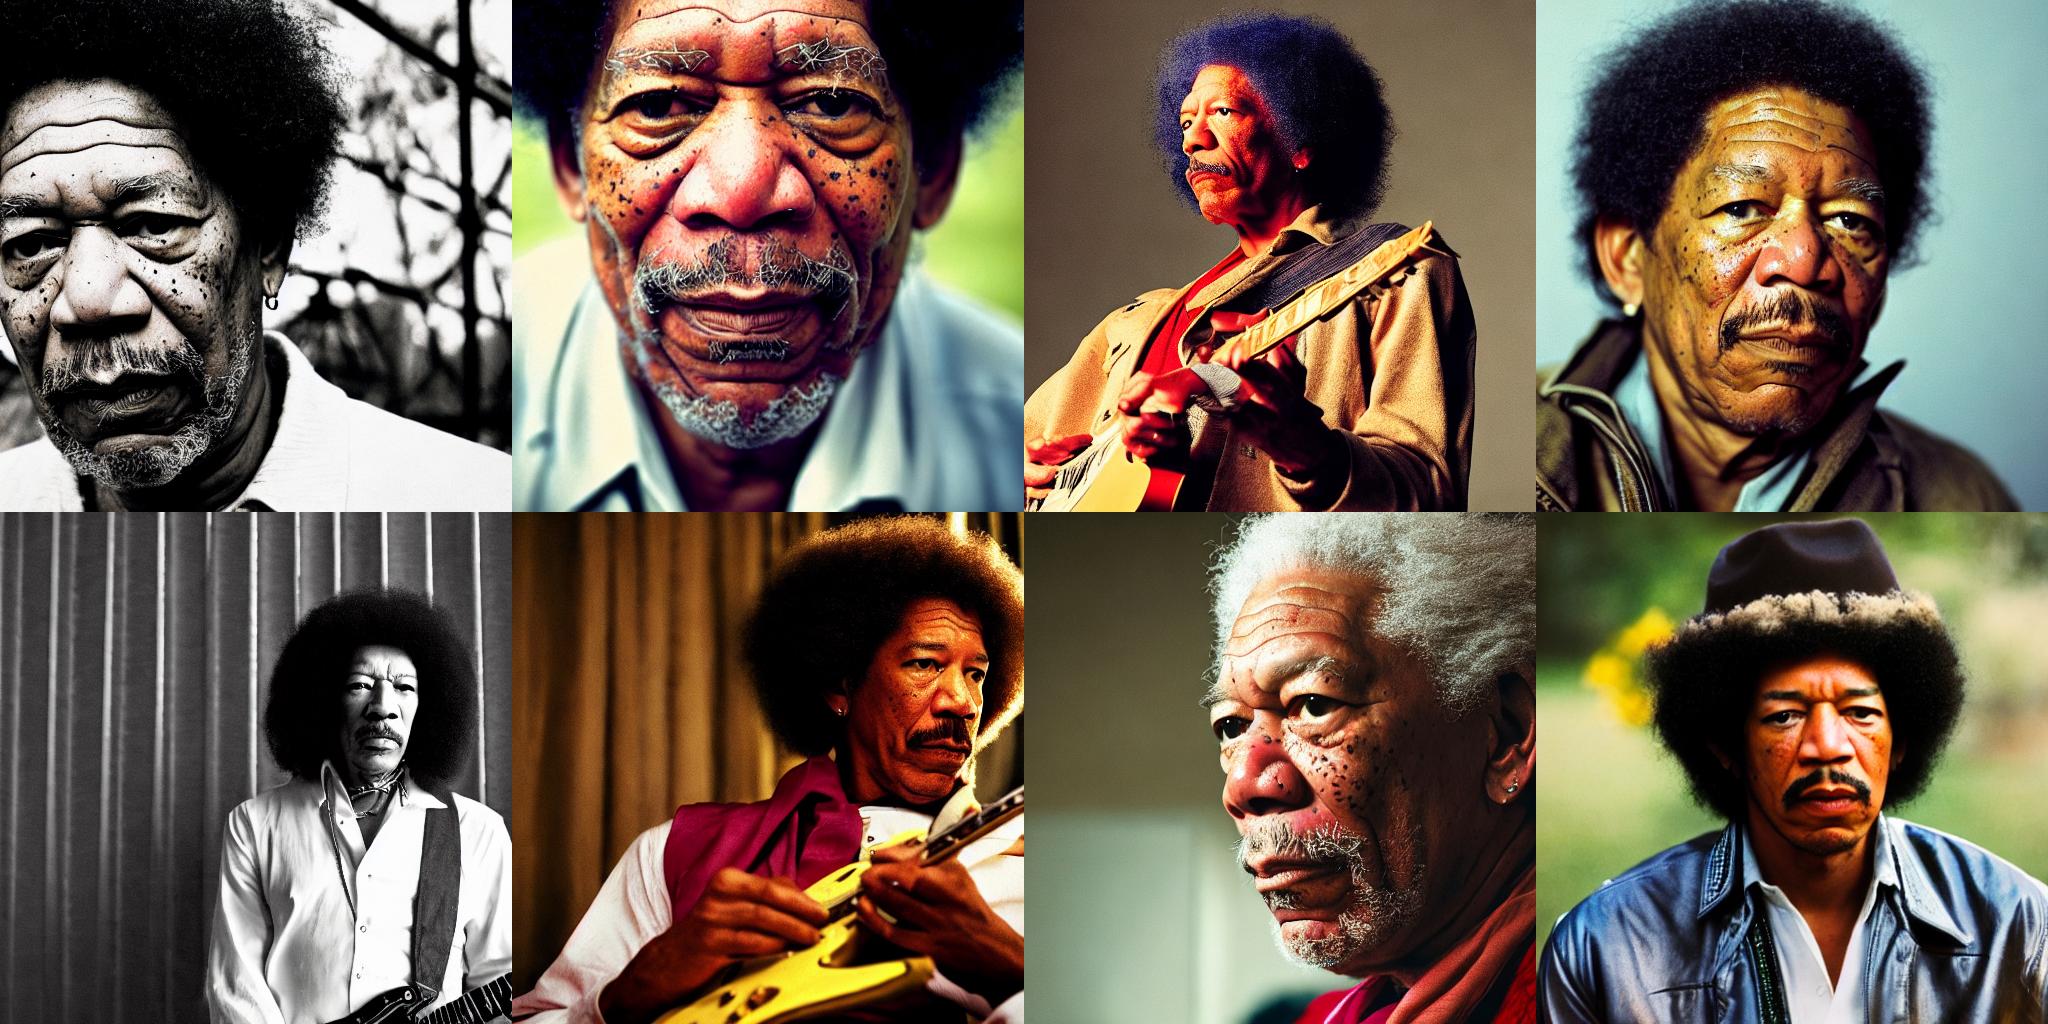
prompt = "A cinematic film still of Morgan Freeman starring as Jimi Hendrix, portrait, 40mm lens, shallow depth of field, close up, split lighting, cinematic"
prompt = [prompt] * jax.device_count()
prompt_ids = pipeline.prepare_inputs(prompt)
prompt_ids.shape
"(8, 77)"
模型参数和输入必须在 8 个并行设备之间复制。参数字典被复制为
flax.jax_utils.replicate
它遍历字典并改变权重的形状,因此它们被重复 8 次。数组的复制使用
碎片
。
# parameters
p_params = replicate(params)

# arrays
prompt_ids = shard(prompt_ids)
prompt_ids.shape
"(8, 1, 77)"
这种形状意味着 8 个设备中的每一个都接收一个输入作为输入
jnp
具有形状的数组
(1, 77)
, 在哪里
1
是每个设备的批量大小。在具有足够内存的 TPU 上,批处理大小可以大于
1
如果您想一次生成多个图像(每个芯片)。
接下来,创建一个随机数生成器以传递给生成函数。这是 Flax 中的标准程序,它对随机数非常严肃且固执己见。所有处理随机数的函数都应该接收一个生成器以确保可重复性,即使您在多个分布式设备上进行训练也是如此。
下面的辅助函数使用种子来初始化随机数生成器。只要您使用相同的种子,您就会得到完全相同的结果。在本指南后面探索结果时,请随意使用不同的种子。
def create\_key(seed=0):
    return jax.random.PRNGKey(seed)
辅助函数,或者
rng
,被分割 8 次,因此每个设备接收不同的生成器并生成不同的图像。
rng = create_key(0)
rng = jax.random.split(rng, jax.device_count())
要利用 JAX 在 TPU 上的优化速度,请传递
jit=真
到管道将 JAX 代码编译成有效的表示形式,并确保模型在 8 个设备上并行运行。
您需要确保所有输入在后续调用中具有相同的形状,其他 JAX 将需要重新编译速度较慢的代码。
第一次推理运行需要更多时间,因为它需要编译代码,但后续调用(即使使用不同的输入)要快得多。例如,在 TPU v2-8 上编译需要一分多钟,但随后大约需要 7秒 在未来的推理运行中!
%%time
images = pipeline(prompt_ids, p_params, rng, jit=True)[0]

"CPU times: user 56.2 s, sys: 42.5 s, total: 1min 38s"
"Wall time: 1min 29s"
返回的数组具有形状
(8, 1, 512, 512, 3)
应该对其进行重塑以删除第二个维度并获得 8 个图像
512×512×3
。然后您可以使用
numpy_to_pil()
函数将数组转换为图像。
from diffusers import make_image_grid

images = images.reshape((images.shape[0] * images.shape[1],) + images.shape[-3:])
images = pipeline.numpy_to_pil(images)
make_image_grid(images, 2, 4)
使用不同的提示
您不必在所有设备上使用相同的提示。例如,生成 8 个不同的提示:
prompts = [
    "Labrador in the style of Hokusai",
    "Painting of a squirrel skating in New York",
    "HAL-9000 in the style of Van Gogh",
    "Times Square under water, with fish and a dolphin swimming around",
    "Ancient Roman fresco showing a man working on his laptop",
    "Close-up photograph of young black woman against urban background, high quality, bokeh",
    "Armchair in the shape of an avocado",
    "Clown astronaut in space, with Earth in the background",
]

prompt_ids = pipeline.prepare_inputs(prompts)
prompt_ids = shard(prompt_ids)

images = pipeline(prompt_ids, p_params, rng, jit=True).images
images = images.reshape((images.shape[0] * images.shape[1],) + images.shape[-3:])
images = pipeline.numpy_to_pil(images)

make_image_grid(images, 2, 4)

并行化如何工作?
🤗 Diffusers 中的 Flax 管道会自动编译模型并在所有可用设备上并行运行。让我们仔细看看这个过程是如何运作的。
JAX 并行化可以通过多种方式完成。最简单的一个是使用
jax.pmap
函数来实现单程序多数据(SPMD)并行化。这意味着运行相同代码的多个副本,每个副本都在不同的数据输入上。更复杂的方法是可能的,您可以转到 JAX
文档
如果您有兴趣,可以更详细地探讨这个主题!
jax.pmap
做了两件事:
- 编译(或“
吉特s”)代码类似于jax.jit()。当您致电时不会发生这种情况pmap,并且只有第一次pmap调用 ped 函数。 - 确保编译的代码在所有可用设备上并行运行。
如需演示,请致电
pmap
在管道上的
_生成
方法(这是生成图像的私有方法,可能会在 🤗 Diffusers 的未来版本中重命名或删除):
p_generate = pmap(pipeline._generate)
打电话后
pmap
,准备好的函数
p_生成
将要:
- 复制底层函数,
管道._生成,在每个设备上。 - 向每个设备发送输入参数的不同部分(这就是为什么需要调用
碎片
功能)。在这种情况下,
prompt_ids有形状(8, 1, 77, 768)所以数组被分成8个,每个副本_生成接收具有形状的输入(1, 77, 768)。
这里要注意的最重要的事情是批量大小(本例中为 1)以及对代码有意义的输入维度。您无需更改任何其他内容即可使代码并行工作。
第一次调用管道需要更多时间,但之后的调用速度要快得多。这
block_until_ready
函数用于正确测量推理时间,因为 JAX 使用异步调度并尽快将控制权返回给 Python 循环。您不需要在代码中使用它;当您想要使用尚未具体化的计算结果时,阻塞会自动发生。
%%time
images = p_generate(prompt_ids, p_params, rng)
images = images.block_until_ready()
"CPU times: user 1min 15s, sys: 18.2 s, total: 1min 34s"
"Wall time: 1min 15s"
检查您的图像尺寸以查看它们是否正确:
images.shape
"(8, 1, 512, 512, 3)"
