预处理
译者:BrightLi
项目地址:https://huggingface.apachecn.org/docs/transformers/preprocessing
在你可以对数据集进行模型训练之前,数据需要预处理为模型所期望的输入格式。无论你的数据是文本、图像还是音频,它们都需要被转换并组装成张量的批次。🤗 Transformers 提供了一组预处理类来帮助准备你的数据用于模型。在本教程中,你将学习以下内容:
- 对于文本,使用Tokenizer将文本转换为一系列的标记,创建标记的数值表示,并将它们组装成张量。
- 对于语音和音频,使用Feature Extractor从音频波形中提取序列特征并将其转换成张量。
- 对于图像输入,使用ImageProcessor将图像转换成张量。
- 对于多模态输入,使用Processor结合一个 tokenizer 和一个 feature extractor 或 image processor。
AutoProcessor 总是有效,并且会自动为你所使用的模型选择正确的类,无论你是使用 tokenizer、image processor、feature extractor 还是 processor。
在开始之前,安装 🤗 Datasets 以便你可以加载一些数据集进行实验:
pip install datasets
自然语言处理
预处理文本数据的主要工具是分词器。分词器根据一组规则将文本拆分为标记。这些标记被转换为数字,然后是张量,成为模型的输入。模型所需的任何额外输入都由分词器添加。
如果您计划使用预训练模型,使用相关的预训练分词器很重要。这确保了文本按照与预训练语料库相同的方式拆分,并在预训练期间使用相同的对应标记到索引(通常称为词汇表)。
通过使用AutoTokenizer.from_pretrained()方法加载预训练分词器来开始。这将下载模型预训练时使用的词汇表:
>>> from transformers import AutoTokenizer

>>> tokenizer = AutoTokenizer.from_pretrained("google-bert/bert-base-cased")
将您的文本传递给分词器:
>>> encoded_input = tokenizer("Do not meddle in the affairs of wizards, for they are subtle and quick to anger.")
>>>> print(encoded_input)
{'input_ids': [101, 2079, 2025, 19960, 10362, 1999, 1996, 3821, 1997, 16657, 1010, 2005, 2027, 2024, 11259, 1998, 4248, 2000, 4963, 1012, 102],
 'token_type_ids': [0, 0, 0, 0, 0, 0, 0, 0, 0, 0, 0, 0, 0, 0, 0, 0, 0, 0, 0, 0, 0],
 'attention_mask': [1, 1, 1, 1, 1, 1, 1, 1, 1, 1, 1, 1, 1, 1, 1, 1, 1, 1, 1, 1, 1]}
分词器返回一个包含三个重要项目的字典:
-
input_ids 是句子中每个标记对应索引。
-
attention_mask 指示是否应该关注某个标记。
-
token_type_ids 在有多个序列时,标识标记属于哪个序列。
通过解码 input_ids 返回您的输入:
tokenizer.decode(encoded_input["input_ids"])
'[CLS] Do not meddle in the affairs of wizards, for they are subtle and quick to anger. [SEP]'
如您所见,分词器在句子中添加了两个特殊标记 - CLS 和 SEP(分类器和分隔符)。并非所有模型都需要特殊标记,但如果需要,分词器会自动为您添加它们。
如果您想要预处理几个句子,将它们作为一个列表传递给分词器:
batch_sentences = [
    "But what about second breakfast?",
    "Don't think he knows about second breakfast, Pip.",
    "What about elevensies?",
]
encoded_inputs = tokenizer(batch_sentences)
print(encoded_inputs)
{'input_ids': [[101, 1252, 1184, 1164, 1248, 6462, 136, 102],
               [101, 1790, 112, 189, 1341, 1119, 3520, 1164, 1248, 6462, 117, 21902, 1643, 119, 102],
               [101, 1327, 1164, 5450, 23434, 136, 102]],
 'token_type_ids': [[0, 0, 0, 0, 0, 0, 0, 0],
                    [0, 0, 0, 0, 0, 0, 0, 0, 0, 0, 0, 0, 0, 0, 0],
                    [0, 0, 0, 0, 0, 0, 0]],
 'attention_mask': [[1, 1, 1, 1, 1, 1, 1, 1],
                    [1, 1, 1, 1, 1, 1, 1, 1, 1, 1, 1, 1, 1, 1, 1],
                    [1, 1, 1, 1, 1, 1, 1]]}
填充
句子的长度并不总是相同的,这可能是一个问题,因为模型的输入张量需要具有统一的形状。填充是一种策略,通过向较短的句子添加特殊的填充标记来确保张量是矩形的。
将填充参数设置为True,以在批次中对较短的序列进行填充,使其与最长的序列相匹配:
batch_sentences = [
    "But what about second breakfast?",
    "Don't think he knows about second breakfast, Pip.",
    "What about elevensies?",
]
encoded_input = tokenizer(batch_sentences, padding=True)
print(encoded_input)
{'input_ids': [[101, 1252, 1184, 1164, 1248, 6462, 136, 102, 0, 0, 0, 0, 0, 0, 0],
               [101, 1790, 112, 189, 1341, 1119, 3520, 1164, 1248, 6462, 117, 21902, 1643, 119, 102],
               [101, 1327, 1164, 5450, 23434, 136, 102, 0, 0, 0, 0, 0, 0, 0, 0]],
 'token_type_ids': [[0, 0, 0, 0, 0, 0, 0, 0, 0, 0, 0, 0, 0, 0, 0],
                    [0, 0, 0, 0, 0, 0, 0, 0, 0, 0, 0, 0, 0, 0, 0],
                    [0, 0, 0, 0, 0, 0, 0, 0, 0, 0, 0, 0, 0, 0, 0]],
 'attention_mask': [[1, 1, 1, 1, 1, 1, 1, 1, 0, 0, 0, 0, 0, 0, 0],
                    [1, 1, 1, 1, 1, 1, 1, 1, 1, 1, 1, 1, 1, 1, 1],
                    [1, 1, 1, 1, 1, 1, 1, 0, 0, 0, 0, 0, 0, 0, 0]]}
第一句和第三句现在用0进行了填充,因为它们比较短。
截断
在另一种情况下,有时一个序列可能过长,模型无法处理。在这种情况下,你需要将序列截断为更短的长度。
将截断参数设置为True,可将序列截断为模型可接受的最大长度:
>>> batch_sentences = [
    "But what about second breakfast?",
    "Don't think he knows about second breakfast, Pip.",
    "What about elevensies?",
]
>>> encoded_input = tokenizer(batch_sentences, padding=True, truncation=True)
>>> print(encoded_input)
{'input_ids': [[101, 1252, 1184, 1164, 1248, 6462, 136, 102, 0, 0, 0, 0, 0, 0, 0],
               [101, 1790, 112, 189, 1341, 1119, 3520, 1164, 1248, 6462, 117, 21902, 1643, 119, 102],
               [101, 1327, 1164, 5450, 23434, 136, 102, 0, 0, 0, 0, 0, 0, 0, 0]],
 'token_type_ids': [[0, 0, 0, 0, 0, 0, 0, 0, 0, 0, 0, 0, 0, 0, 0],
                    [0, 0, 0, 0, 0, 0, 0, 0, 0, 0, 0, 0, 0, 0, 0],
                    [0, 0, 0, 0, 0, 0, 0, 0, 0, 0, 0, 0, 0, 0, 0]],
 'attention_mask': [[1, 1, 1, 1, 1, 1, 1, 1, 0, 0, 0, 0, 0, 0, 0],
                    [1, 1, 1, 1, 1, 1, 1, 1, 1, 1, 1, 1, 1, 1, 1],
                    [1, 1, 1, 1, 1, 1, 1, 0, 0, 0, 0, 0, 0, 0, 0]]}
查看填充和截断概念指南,以了解更多不同的填充和截断参数。
构建张量
最后,你希望tokenizer返回实际输入到模型的张量。
将return_tensors参数设置为pt(针对PyTorch)或tf(针对TensorFlow):
batch_sentences = [
    "But what about second breakfast?",
    "Don't think he knows about second breakfast, Pip.",
    "What about elevensies?",
]
encoded_input = tokenizer(batch_sentences, padding=True, truncation=True, return_tensors="pt")
print(encoded_input)
{'input_ids': <tf.Tensor: shape=(2, 9), dtype=int32, numpy=
array([[101, 1252, 1184, 1164, 1248, 6462, 136, 102, 0, 0, 0, 0, 0, 0, 0],
       [101, 1790, 112, 189, 1341, 1119, 3520, 1164, 1248, 6462, 117, 21902, 1643, 119, 102],
       [101, 1327, 1164, 5450, 23434, 136, 102, 0, 0, 0, 0, 0, 0, 0, 0]],
      dtype=int32)>,
 'token_type_ids': <tf.Tensor: shape=(2, 9), dtype=int32, numpy=
array([[0, 0, 0, 0, 0, 0, 0, 0, 0, 0, 0, 0, 0, 0, 0],
       [0, 0, 0, 0, 0, 0, 0, 0, 0, 0, 0, 0, 0, 0, 0],
       [0, 0, 0, 0, 0, 0, 0, 0, 0, 0, 0, 0, 0, 0, 0]], dtype=int32)>,
 'attention_mask': <tf.Tensor: shape=(2, 9), dtype=int32, numpy=
array([[1, 1, 1, 1, 1, 1, 1, 1, 0, 0, 0, 0, 0, 0, 0],
       [1, 1, 1, 1, 1, 1, 1, 1, 1, 1, 1, 1, 1, 1, 1],
       [1, 1, 1, 1, 1, 1, 1, 0, 0, 0, 0, 0, 0, 0, 0]], dtype=int32)>}
不同的管道在其__call__()方法中支持tokenizer参数的方式不同。“文本到文本生成”管道只支持(即传递)truncation参数。“文本生成”管道支持max_length、truncation、padding和add_special_tokens参数。在“填充掩码”管道中,可以通过tokenizer_kwargs参数(字典形式)传递tokenizer参数。
音频
对于音频任务,你需要一个特征提取器来准备模型所需的数据集。特征提取器旨在从原始音频数据中提取特征,并将它们转换为张量。
加载MInDS-14数据集(有关如何加载数据集的更多详细信息,请参阅 🤗 Datasets教程),了解如何使用特征提取器处理音频数据集:
访问音频列的第一个元素以查看输入。调用音频列会自动加载并重新采样音频文件:
>>> dataset[0]["audio"]
{'array': array([ 0.        ,  0.00024414, -0.00024414, ..., -0.00024414,
         0.        ,  0.        ], dtype=float32),
 'path': '/root/.cache/huggingface/datasets/downloads/extracted/f14948e0e84be638dd7943ac36518a4cf3324e8b7aa331c5ab11541518e9368c/en-US~JOINT_ACCOUNT/602ba55abb1e6d0fbce92065.wav',
 'sampling_rate': 8000}
这将返回三个项目:
-
array 是将语音信号加载(并可能重新采样)为1D数组。
-
path 指向音频文件的位置。
-
sampling_rate 指的是每秒测量的语音信号中的数据点数。
在本教程中,你将使用Wav2Vec2模型。查看模型卡片,你会了解到Wav2Vec2是在16kHz采样的语音音频上预训练的。确保你的音频数据的采样率与用于预训练模型的数据集的采样率相匹配是很重要的。如果你的数据的采样率不同,那么你需要对你的数据进行重新采样。
1.使用🤗 Datasets的cast_column方法将采样率上采样到16kHz:
>>> dataset = dataset.cast_column("audio", Audio(sampling_rate=16_000))
再次调用音频列以重新采样音频文件:
>>> dataset[0]["audio"]
{'array': array([ 2.3443763e-05,  2.1729663e-04,  2.2145823e-04, ...,
         3.8356509e-05, -7.3497440e-06, -2.1754686e-05], dtype=float32),
 'path': '/root/.cache/huggingface/datasets/downloads/extracted/f14948e0e84be638dd7943ac36518a4cf3324e8b7aa331c5ab11541518e9368c/en-US~JOINT_ACCOUNT/602ba55abb1e6d0fbce92065.wav',
 'sampling_rate': 16000}
接下来,加载一个特征提取器来标准化和填充输入。在对文本数据进行填充时,对于较短的序列会添加0。同样的方法适用于音频数据。特征提取器会在数组中添加0 - 被解释为静音。
使用AutoFeatureExtractor.from_pretrained()加载特征提取器:
>>> from transformers import AutoFeatureExtractor

>>> feature_extractor = AutoFeatureExtractor.from_pretrained("facebook/wav2vec2-base")
将音频数组传递给特征提取器。我们还建议在特征提取器中添加sampling_rate参数,以便更好地调试可能发生的任何静默错误。
>>> audio_input = [dataset[0]["audio"]["array"]]
>>> feature_extractor(audio_input, sampling_rate=16000)
{'input_values': [array([ 3.8106556e-04,  2.7506407e-03,  2.8015103e-03, ...,
        5.6335266e-04,  4.6588284e-06, -1.7142107e-04], dtype=float32)]}
就像tokenizer一样,你可以应用填充或截断来处理批次中的可变序列。看看这两个音频样本的序列长度:
>>> dataset[0]["audio"]["array"].shape
(173398,)
>>> dataset[1]["audio"]["array"].shape
(106496,)
创建一个函数来预处理数据集,使音频样本具有相同的长度。指定一个最大样本长度,特征提取器将填充或截断序列以匹配它:
def preprocess_function(examples):
    audio_arrays = [x["array"] for x in examples["audio"]]
    inputs = feature_extractor(
        audio_arrays,
        sampling_rate=16000,
        padding=True,
        max_length=100000,
        truncation=True,
    )
    return inputs
将preprocess_function应用于数据集中的前几个示例:
>>> processed_dataset = preprocess_function(dataset[:5])
样本长度现在相同,并且与指定的最大长度匹配。你现在可以将处理过的数据集传递给模型了!
>>> processed_dataset["input_values"][0].shape
(100000,)
>>> processed_dataset["input_values"][1].shape
(100000,)
计算机视觉
对于计算机视觉任务,你需要一个图像处理器来准备模型所需的数据集。图像预处理包括几个步骤,这些步骤将图像转换为模型所期望的输入。这些步骤包括但不限于调整大小、归一化、颜色通道校正和将图像转换为张量。
图像预处理通常伴随着某种形式的图像增强。图像预处理和图像增强都会转换图像数据,但它们服务于不同的目的: 图像增强以可以帮助防止过拟合和提高模型的鲁棒性的方式改变图像。你可以在增强数据时发挥创意 - 调整亮度和颜色、裁剪、旋转、调整大小、缩放等。然而,要注意不要通过你的增强改变图像的意义。 图像预处理保证图像与模型期望的输入格式相匹配。在微调计算机视觉模型时,必须像模型最初训练时那样精确地进行图像预处理。 你可以使用你喜欢的任何库进行图像增强。对于图像预处理,使用与模型相关的ImageProcessor。
加载food101数据集(有关如何加载数据集的更多详细信息,请参阅 🤗 Datasets教程),了解如何使用图像处理器处理计算机视觉数据集:
使用🤗 Datasets的split参数仅从训练拆分中加载一个小样本,因为这个数据集相当大!
>>> from datasets import load_dataset

>>> dataset = load_dataset("food101", split="train[:100]")
接下来,使用🤗 Datasets的Image特性查看图像:
dataset[0]["image"]

使用AutoImageProcessor.from_pretrained()加载图像处理器:
>>> from transformers import AutoImageProcessor

>>> image_processor = AutoImageProcessor.from_pretrained("google/vit-base-patch16-224")
首先,让我们添加一些图像增强。你可以使用你喜欢的任何库,但在本教程中,我们将使用torchvision的transforms模块。如果你对使用另一个数据增强库感兴趣,可以在Albumentations或Kornia笔记本中学习如何使用。
1.在这里,我们使用Compose将几个转换链接在一起 - RandomResizedCrop和ColorJitter。请注意,对于调整大小,我们可以从image_processor获取图像大小要求。对于一些模型,需要确切的高度和宽度,而对于其他模型,只定义了最短边。
>>> from torchvision.transforms import RandomResizedCrop, ColorJitter, Compose

>>> size = (
    image_processor.size["shortest_edge"]
    if "shortest_edge" in image_processor.size
    else (image_processor.size["height"], image_processor.size["width"])
)

>>> _transforms = Compose([RandomResizedCrop(size), ColorJitter(brightness=0.5, hue=0.5)])
2.模型接受pixel_values作为其输入。ImageProcessor可以负责对图像进行归一化,并生成适当的张量。创建一个函数,将图像增强和图像预处理结合起来,为一批图像生成pixel_values:
def transforms(examples):
    images = [_transforms(img.convert("RGB")) for img in examples["image"]]
    examples["pixel_values"] = image_processor(images, do_resize=False, return_tensors="pt")["pixel_values"]
    return examples
在上面的示例中,我们将do_resize设置为False,因为我们已经在图像增强转换中调整了图像的大小,并利用了适当的image_processor的size属性。如果在图像增强过程中不调整图像大小,可以省略此参数。默认情况下,ImageProcessor会处理调整大小。 如果希望将图像归一化作为增强转换的一部分,使用image_processor.image_mean和image_processor.image_std值。
3.然后使用🤗 Datasets的set_transform方法实时应用转换:
>>> dataset.set_transform(transforms)
4.现在当你访问图像时,你会注意到图像处理器已经添加了pixel_values。现在你可以将处理过的数据集传递给模型了!
>>> dataset[0].keys()
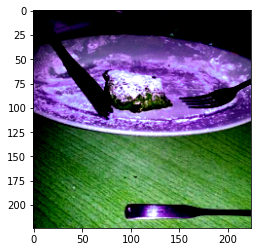
以下是应用转换后图像的样子。图像已被随机裁剪,其颜色属性也有所不同。
>>> import numpy as np
>>> import matplotlib.pyplot as plt

>>> img = dataset[0]["pixel_values"]
>>> plt.imshow(img.permute(1, 2, 0))
对于像目标检测、语义分割、实例分割和全景分割这样的任务,ImageProcessor提供了后处理方法。这些方法将模型的原始输出转换为有意义的预测,如边界框或分割图。
填充
在某些情况下,例如在微调DETR时,模型会在训练时应用尺度增强。这可能会导致批处理中的图像大小不同。您可以使用DetrImageProcessor的DetrImageProcessor.pad()方法并定义一个自定义的collate_fn来将图像组合在一起。
def collate_fn(batch):
    pixel_values = [item["pixel_values"] for item in batch]
    encoding = image_processor.pad(pixel_values, return_tensors="pt")
    labels = [item["labels"] for item in batch]
    batch = {}
    batch["pixel_values"] = encoding["pixel_values"]
    batch["pixel_mask"] = encoding["pixel_mask"]
    batch["labels"] = labels
    return batch
多模态
对于涉及多模态输入的任务,您需要一个处理器来为模型准备数据集。一个处理器将两个处理对象(如tokenizer和feature extractor)结合在一起。
加载LJ Speech数据集(有关如何加载数据集的更多详细信息,请参阅🤗 Datasets教程),了解如何使用处理器进行自动语音识别(ASR):
>>> from datasets import load_dataset

>>> lj_speech = load_dataset("lj_speech", split="train")
对于ASR,您主要关注音频和文本,因此可以删除其他列:
lj_speech = lj_speech.map(remove_columns=["file", "id", "normalized_text"])
现在查看音频和文本列:
>>> lj_speech[0]["audio"]
{'array': array([-7.3242188e-04, -7.6293945e-04, -6.4086914e-04, ...,
         7.3242188e-04,  2.1362305e-04,  6.1035156e-05], dtype=float32),
 'path': '/root/.cache/huggingface/datasets/downloads/extracted/917ece08c95cf0c4115e45294e3cd0dee724a1165b7fc11798369308a465bd26/LJSpeech-1.1/wavs/LJ001-0001.wav',
 'sampling_rate': 22050}
>>> lj_speech[0]["text"]
'Printing, in the only sense with which we are at present concerned, differs from most if not from all the arts and crafts represented in the Exhibition'
请记住,您应该始终重新采样音频数据集的采样率,以匹配用于预训练模型的数据集的采样率!
>>> lj_speech = lj_speech.cast_column("audio", Audio(sampling_rate=16_000))
使用AutoProcessor.from_pretrained()加载处理器:
from transformers import AutoProcessor

processor = AutoProcessor.from_pretrained("facebook/wav2vec2-base-960h")
1.创建一个函数,将包含在数组中的音频数据转换为input_values,并将文本标记化为labels。这些是模型的输入:
>>> def prepare_dataset(example):
    audio = example["audio"]

    example.update(processor(audio=audio["array"], text=example["text"], sampling_rate=16000))

    return example
2.将prepare_dataset函数应用于一个样本:
>>> prepare_dataset(lj_speech[0])
现在,处理器已经添加了input_values和labels,并且采样率也被正确地降低到了16kHz。现在你可以将处理过的数据集传递给模型了!
