文本转图像
译者:片刻小哥哥
项目地址:https://huggingface.apachecn.org/docs/diffusers/using-diffusers/conditional_image_generation
原始地址:https://huggingface.co/docs/diffusers/using-diffusers/conditional_image_generation
![]()

当您想到扩散模型时,文本到图像通常是首先想到的事情之一。文本到图像从文本描述生成图像(例如,“丛林中的宇航员,冷色调,柔和的颜色,详细,8k”),也称为 迅速的 。
从非常高的水平来看,扩散模型采用提示和一些随机的初始噪声,并迭代地消除噪声以构建图像。这 去噪 该过程由提示引导,一旦去噪过程在预定数量的时间步长后结束,图像表示就会被解码为图像。
阅读 稳定扩散如何工作? 博客文章以了解有关潜在扩散模型如何工作的更多信息。
您可以通过 🤗 Diffusers 中的提示分两步生成图像:
- 将检查点加载到 AutoPipelineForText2Image 类,它根据检查点自动检测要使用的适当管道类:
from diffusers import AutoPipelineForText2Image
import torch

pipeline = AutoPipelineForText2Image.from_pretrained(
    "runwayml/stable-diffusion-v1-5", torch_dtype=torch.float16, variant="fp16"
).to("cuda")
- 向管道传递提示以生成图像:
image = pipeline(
    "stained glass of darth vader, backlight, centered composition, masterpiece, photorealistic, 8k"
).images[0]
image

热门车型
最常见的文本到图像模型是 稳定扩散 v1.5 , 稳定扩散 XL (SDXL) , 和 康定斯基2.2 。还有 ControlNet 模型或适配器可与文本到图像模型一起使用,以便更直接地控制生成图像。每个模型的结果因其架构和训练过程而略有不同,但无论您选择哪种模型,它们的用法或多或少是相同的。让我们对每个模型使用相同的提示并比较它们的结果。
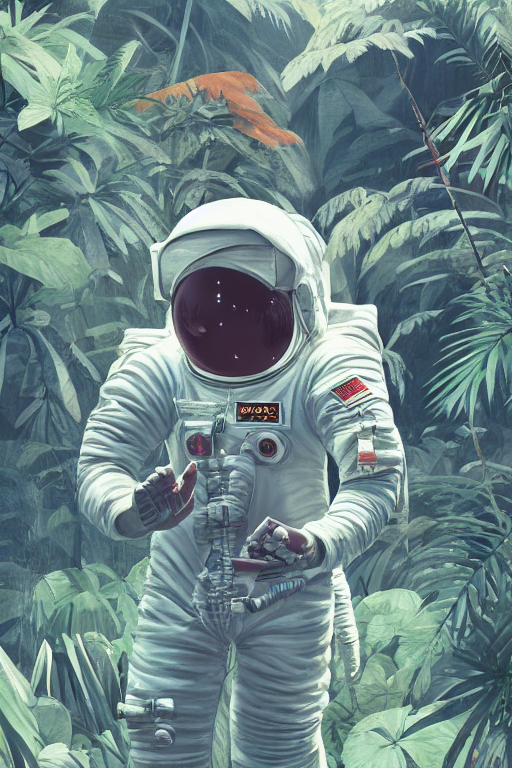
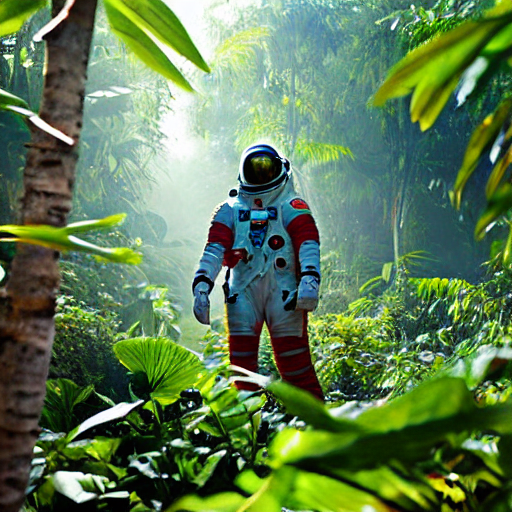
稳定扩散 v1.5
稳定扩散 v1.5 是一个潜在扩散模型,初始化为 稳定扩散 v1-4 ,并针对来自 LAION-Aesthetics V2 数据集的 512x512 图像进行了 595K 步的微调。您可以像这样使用这个模型:
from diffusers import AutoPipelineForText2Image
import torch

pipeline = AutoPipelineForText2Image.from_pretrained(
    "runwayml/stable-diffusion-v1-5", torch_dtype=torch.float16, variant="fp16"
).to("cuda")
generator = torch.Generator("cuda").manual_seed(31)
image = pipeline("Astronaut in a jungle, cold color palette, muted colors, detailed, 8k", generator=generator).images[0]
image
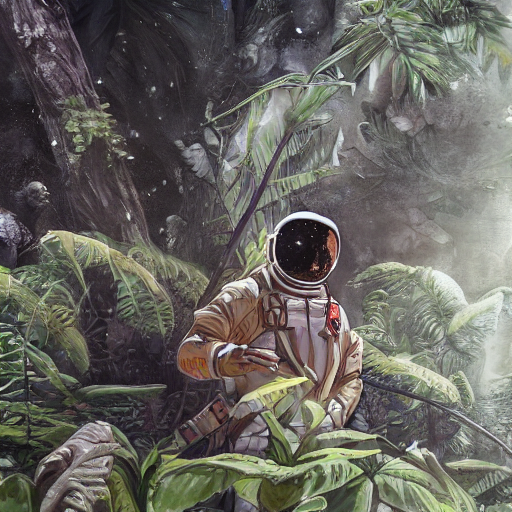
稳定扩散XL
SDXL 是之前稳定扩散模型的更大版本,涉及两阶段模型过程,可为图像添加更多细节。它还包括一些额外的 微调节 生成以主题为中心的高质量图像。看看更全面的 SDXL 指南以了解有关如何使用它的更多信息。一般来说,您可以使用 SDXL,例如:
from diffusers import AutoPipelineForText2Image
import torch

pipeline = AutoPipelineForText2Image.from_pretrained(
    "stabilityai/stable-diffusion-xl-base-1.0", torch_dtype=torch.float16, variant="fp16"
).to("cuda")
generator = torch.Generator("cuda").manual_seed(31)
image = pipeline("Astronaut in a jungle, cold color palette, muted colors, detailed, 8k", generator=generator).images[0]
image
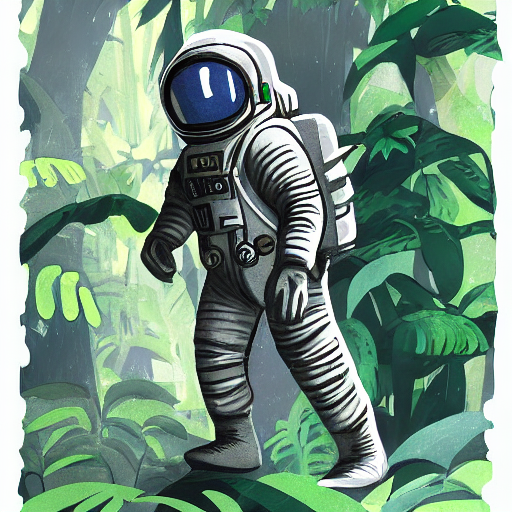
康定斯基2.2
康定斯基模型与稳定扩散模型有点不同,因为它还使用图像先验模型来创建嵌入,用于更好地对齐扩散模型中的文本和图像。
使用 Kandinsky 2.2 最简单的方法是:
from diffusers import AutoPipelineForText2Image
import torch

pipeline = AutoPipelineForText2Image.from_pretrained(
    "kandinsky-community/kandinsky-2-2-decoder", torch_dtype=torch.float16
).to("cuda")
generator = torch.Generator("cuda").manual_seed(31)
image = pipeline("Astronaut in a jungle, cold color palette, muted colors, detailed, 8k", generator=generator).images[0]
image
控制网
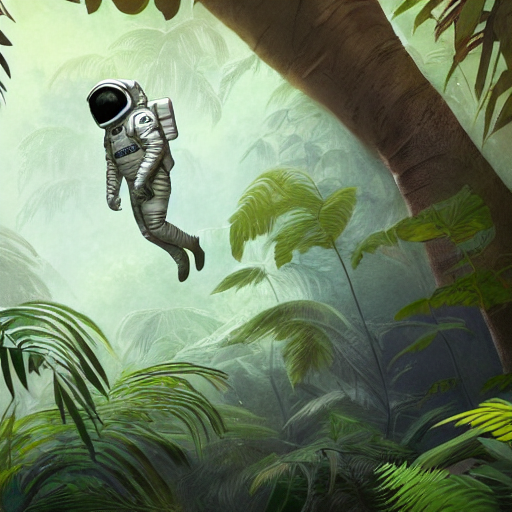
ControlNet 模型是在文本到图像模型之上进行微调的辅助模型或适配器,例如 稳定扩散 v1.5 。将 ControlNet 模型与文本到图像模型结合使用,可以提供多种选项,以便更明确地控制如何生成图像。使用 ControlNet,您可以向模型添加额外的调节输入图像。例如,如果您提供人体姿势的图像(通常表示为连接到骨架的多个关键点)作为条件输入,则模型会生成遵循图像姿势的图像。查看更深入的内容 控制网 指南以了解有关其他调节输入以及如何使用它们的更多信息。
在此示例中,我们使用人体姿势估计图像来调节 ControlNet。加载针对人体姿势估计进行预训练的 ControlNet 模型:
from diffusers import ControlNetModel, AutoPipelineForText2Image
from diffusers.utils import load_image
import torch

controlnet = ControlNetModel.from_pretrained(
    "lllyasviel/control\_v11p\_sd15\_openpose", torch_dtype=torch.float16, variant="fp16"
).to("cuda")
pose_image = load_image("https://huggingface.co/lllyasviel/control\_v11p\_sd15\_openpose/resolve/main/images/control.png")
通过
控制网
到
AutoPipelineForText2Image
,并提供提示和姿态估计图像:
pipeline = AutoPipelineForText2Image.from_pretrained(
    "runwayml/stable-diffusion-v1-5", controlnet=controlnet, torch_dtype=torch.float16, variant="fp16"
).to("cuda")
generator = torch.Generator("cuda").manual_seed(31)
image = pipeline("Astronaut in a jungle, cold color palette, muted colors, detailed, 8k", image=pose_image, generator=generator).images[0]
image
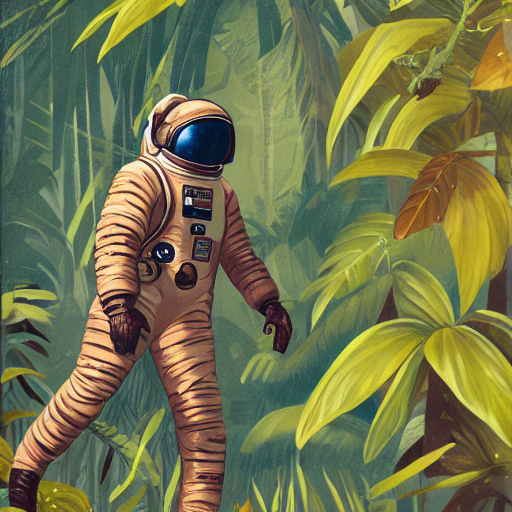
稳定扩散 v1.5
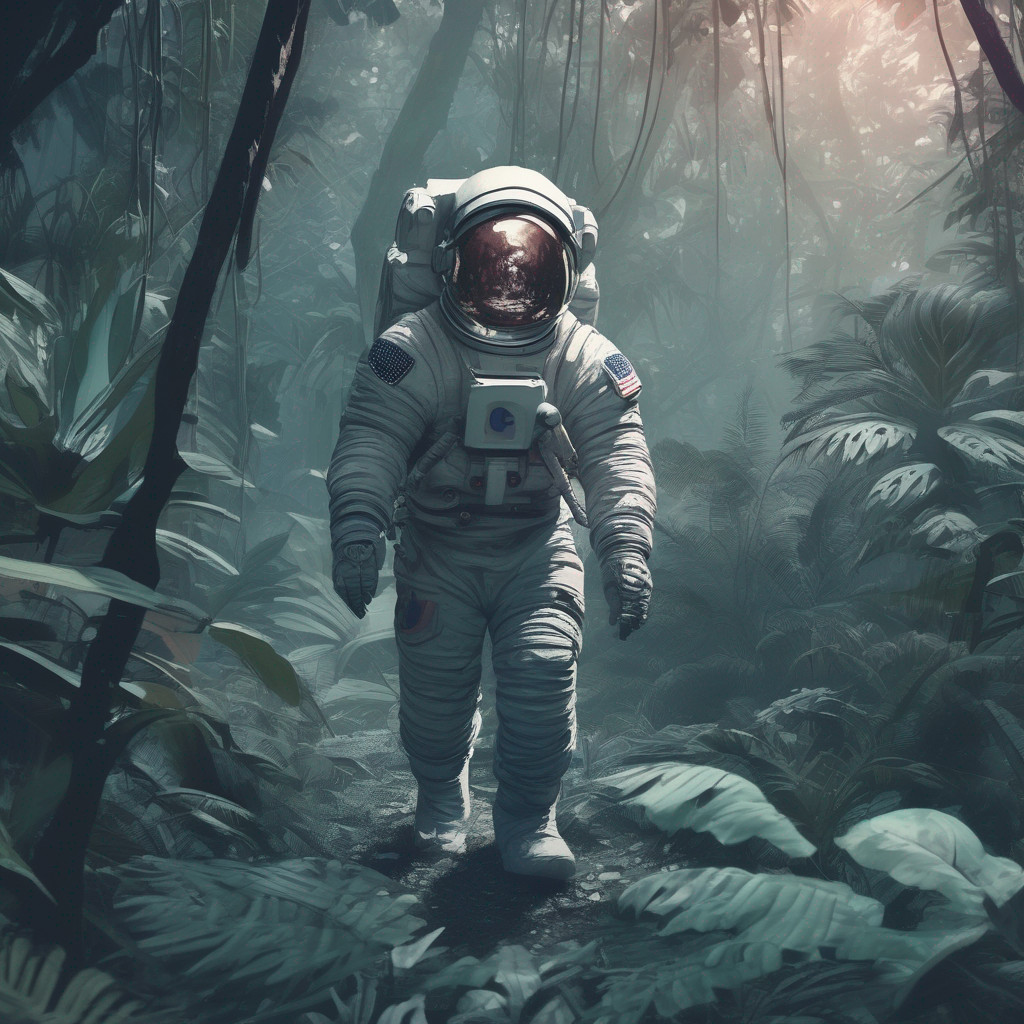
稳定扩散XL
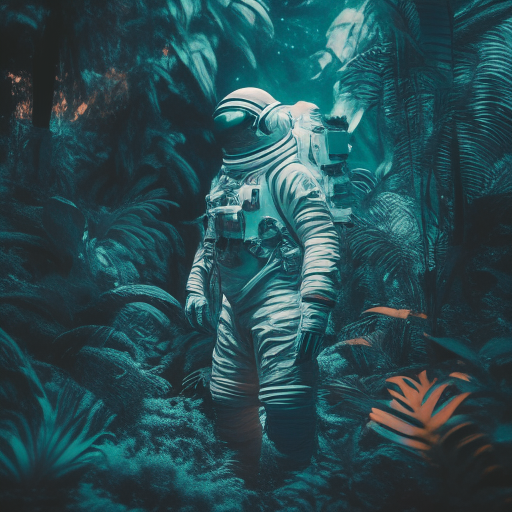
康定斯基2.2
ControlNet(姿势调节)
配置管道参数
可以在管道中配置许多参数,这些参数会影响图像的生成方式。您可以更改图像的输出大小、指定负面提示以提高图像质量等等。本节将深入探讨如何使用这些参数。
高度和宽度
这
高度
和
宽度
参数控制生成图像的高度和宽度(以像素为单位)。默认情况下,Stable Diffusion v1.5 模型输出 512x512 图像,但您可以将其更改为 8 的倍数的任何大小。例如,要创建矩形图像:
from diffusers import AutoPipelineForText2Image
import torch

pipeline = AutoPipelineForText2Image.from_pretrained(
    "runwayml/stable-diffusion-v1-5", torch_dtype=torch.float16, variant="fp16"
).to("cuda")
image = pipeline(
    "Astronaut in a jungle, cold color palette, muted colors, detailed, 8k", height=768, width=512
).images[0]
image
根据训练数据集中的图像大小,其他模型可能具有不同的默认图像大小。例如,SDXL 的默认图像尺寸为 1024x1024,并使用较低的
高度
和
宽度
值可能会导致图像质量较低。请务必先检查模型的 API 参考!
指导尺度
这
指导规模
参数影响提示对图像生成的影响程度。较低的值使模型具有“创造力”,可以生成与提示相关性更松散的图像。更高
指导规模
值会促使模型更严格地遵循提示,如果该值太高,您可能会在生成的图像中观察到一些伪影。
from diffusers import AutoPipelineForText2Image
import torch

pipeline = AutoPipelineForText2Image.from_pretrained(
    "runwayml/stable-diffusion-v1-5", torch_dtype=torch.float16
).to("cuda")
image = pipeline(
    "Astronaut in a jungle, cold color palette, muted colors, detailed, 8k", guidance_scale=3.5
).images[0]
image
指导规模= 2.5
指导规模= 7.5
指导规模= 10.5
负面提示
就像提示如何引导一代人一样, 否定提示 引导模型远离您不希望模型生成的内容。这通常用于通过去除较差或不良的图像特征(例如“低分辨率”或“不良细节”)来提高整体图像质量。您还可以使用否定提示来删除或修改图像的内容和样式。
from diffusers import AutoPipelineForText2Image
import torch

pipeline = AutoPipelineForText2Image.from_pretrained(
    "runwayml/stable-diffusion-v1-5", torch_dtype=torch.float16
).to("cuda")
image = pipeline(
    prompt="Astronaut in a jungle, cold color palette, muted colors, detailed, 8k",
    negative_prompt="ugly, deformed, disfigured, poor details, bad anatomy",
).images[0]
image
negative_prompt =“丑陋、变形、毁容、细节差、解剖结构不良”

否定_prompt =“宇航员”
发电机
A
torch.Generator
对象通过设置手动种子来实现管道中的可重复性。您可以使用
发电机
生成批量图像并迭代改进从种子生成的图像,如
通过确定性生成提高图像质量
指导。
您可以设置种子并
发电机
如下所示。使用 a 创建图像
发电机
每次应该返回相同的结果,而不是随机生成新图像。
from diffusers import AutoPipelineForText2Image
import torch

pipeline = AutoPipelineForText2Image.from_pretrained(
    "runwayml/stable-diffusion-v1-5", torch_dtype=torch.float16
).to("cuda")
generator = torch.Generator(device="cuda").manual_seed(30)
image = pipeline(
    "Astronaut in a jungle, cold color palette, muted colors, detailed, 8k",
    generator=generator,
).images[0]
image
控制图像生成
除了配置管道参数之外,还有多种方法可以对图像的生成方式进行更多控制,例如提示加权和 ControlNet 模型。
提示称重
提示加权是一种用于增加或减少提示中概念的重要性以强调或最小化图像中的某些特征的技术。我们建议使用 强制 库来帮助您生成加权提示嵌入。
了解如何在中创建提示嵌入 提示权重 指导。本示例重点介绍如何在管道中使用提示嵌入。
创建嵌入后,您可以将它们传递给
提示嵌入
(和
否定提示嵌入
如果您在管道中使用否定提示)参数。
from diffusers import AutoPipelineForText2Image
import torch

pipeline = AutoPipelineForText2Image.from_pretrained(
    "runwayml/stable-diffusion-v1-5", torch_dtype=torch.float16
).to("cuda")
image = pipeline(
    prompt_embeds=prompt_embeds, # generated from Compel
    negative_prompt_embeds=negative_prompt_embeds, # generated from Compel
).images[0]
控制网
正如你在 控制网 部分,这些模型通过合并额外的调节图像输入,提供了一种更灵活、更准确的生成图像的方法。每个 ControlNet 模型都针对特定类型的调节图像进行预训练,以生成与其相似的新图像。例如,如果您采用在深度图上预训练的 ControlNet 模型,则可以为模型提供深度图作为条件输入,它将生成保留其中空间信息的图像。这比在提示中指定深度信息更快更容易。您甚至可以将多个调节输入与一个 MultiControlNet !
您可以使用多种类型的调节输入,并且🤗 Diffusers 支持用于稳定扩散的 ControlNet 和 SDXL 模型。看看更全面的 控制网 了解如何使用这些模型的指南。
优化
扩散模型很大,并且图像去噪的迭代性质在计算上是昂贵且密集的。但这并不意味着您需要访问强大的(甚至许多)GPU 才能使用它们。有许多优化技术可用于在消费者和免费资源上运行扩散模型。例如,您可以以半精度加载模型权重以节省 GPU 内存并提高速度,或者将整个模型卸载到 GPU 以节省更多内存。
PyTorch 2.0 还支持一种内存效率更高的注意力机制,称为
缩放点积注意力
如果您使用 PyTorch 2.0,则会自动启用。您可以将其与
torch.compile
进一步加快您的代码速度:
from diffusers import AutoPipelineForText2Image
import torch

pipeline = AutoPipelineForText2Image.from_pretrained("runwayml/stable-diffusion-v1-5", torch_dtype=torch.float16, variant="fp16").to("cuda")
pipeline.unet = torch.compile(pipeline.unet, mode="reduce-overhead", fullgraph=True)
有关如何优化代码以节省内存并加快推理速度的更多提示,请阅读 内存和速度 和 torch2.0 指南。
